
GoHighLevel Domain Setup: Complete A to Z Guide
GoHighLevel domain setup is one of those foundational tasks that quietly affects almost every customer-facing piece of your account. Shared form links, payment links, calendar booking links, the URLs your funnels and websites live on, where WordPress is hosted, how your emails sign and authenticate themselves to inbox providers, the address your client portal lives at, all of it depends on getting the right domains configured in the right places.
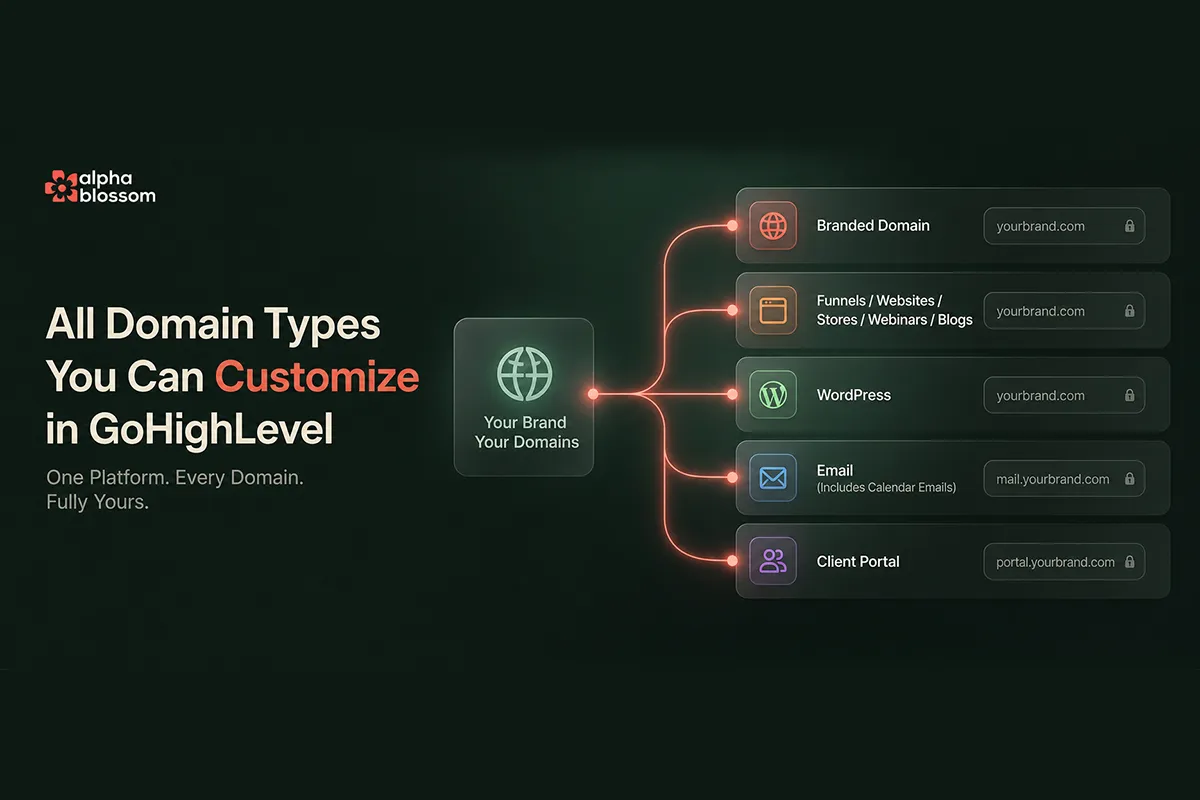
There are 5 different domain types you can set up in GoHighLevel, and each one has its own setup screen, its own DNS records, and its own gotchas. None of them are hard once you know what they are, but most users only set up one or two and leave the rest using HighLevel's default URLs. That looks unprofessional to customers, hurts email deliverability, and forces awkward workarounds when you start scaling.
This guide walks through all 5 GoHighLevel domain types from start to finish: branded domain, the main domain for funnels and websites and stores and blogs and webinars, WordPress, email sending, and client portal. I will show you what each one is for, where to set it up, and how to use Cloudflare to handle the DNS records automatically so you do not have to copy and paste a single record by hand. Set this up once at the start of a new sub-account and you never have to think about it again.
GoHighLevel Domain Setup: Complete A to Z Guide
The 5 Domain Types You Can Set Up in GoHighLevel
2. Funnels, Websites, Stores, Webinars, and Blogs Domain Setup
Picking the Right Domain Variant (www vs non-www)
Assigning the Domain to a Funnel, Website, Blog, or Store
When WordPress Hosting Makes Sense
4. Email Sending Domain Setup (The Big One)
Setting the Email Headers (From Name and From Email)
Adding Multiple Email Subdomains
Domain Configuration: Assigning Email Subdomains to Use Cases
Google Postmaster (Optional but Recommended)
Cloudflare Tips That Apply to All GoHighLevel Domains
Use the Comment Field on Every Record
Cloudflare Is Recommended But Not Required
Watch "Set Up Every GoHighLevel Domain the Right Way (Full A to Z Walkthrough)" on Youtube
The 5 Domain Types You Can Set Up in GoHighLevel
Before we walk through each setup, here is the lay of the land. GoHighLevel separates domains into 5 distinct categories because each one serves a different part of the platform and each one needs its own DNS records.
Branded Domain (e.g.
link.yourbrand.com) - the domain that appears on shared form links, calendar booking links, and payment links that are not embedded in a funnel or website.Funnels, Websites, Stores, Webinars, and Blogs Domain (e.g.
yourbrand.comorgo.yourbrand.com) - the main customer-facing domain where your funnels and websites live.WordPress Domain (e.g.
wp.yourbrand.com) - if you are using HighLevel's native WordPress hosting, this is the domain that points at your WordPress site.Email Sending Domain(s) (e.g.
mail.yourbrand.com,book.yourbrand.com,payments.yourbrand.com) - dedicated subdomains used to send outbound email with DKIM, SPF, and DMARC authentication.Client Portal Domain (e.g.
members.yourbrand.com) - the address your customers go to for courses, communities, files, and invoices.
You can use a single root domain across all 5 categories by using different subdomains in front (link, go, wp, mail, members), or you can use entirely separate domains if you prefer. The decision depends on your branding setup. For most agency owners and SaaS operators, one root domain with 5 subdomains is the cleanest approach.
1. Branded Domain Setup
The branded domain controls the URL that shows up on shared links from your sub-account. When you create a form, a calendar, or a payment link in GoHighLevel and you click "share link" to send it directly (not embed it in a funnel), that link uses your branded domain. Without a branded domain set up, the link uses whatever your agency's default is (in my case, the AlphaBlossom CRM uses apps.alphablossom.com), which works but does not match your brand.
Where to Set It Up
Go to Settings, then Business Profile. Near the top of the page is a field called Random Domain (or Branded Domain depending on your version). This is where you enter your branded subdomain.
Picking the Subdomain
Use a subdomain in front of your main domain. The convention is link, but share or go work too. For example, if your main website is gobonsai.ai, your branded domain would be link.gobonsai.ai. The reason for the subdomain is that you cannot use the root domain here if it is already in use for your main website, the two would conflict. The subdomain in front gives you a clean separate URL space.
Connecting via Cloudflare
I always recommend hosting your domains on Cloudflare because it is free, fast, and GoHighLevel has a one-click integration. After you enter your branded subdomain, click Continue. GoHighLevel looks up where the domain is hosted and offers to authorize the connection through the host's API. With Cloudflare it usually completes in 20 to 30 seconds. GoHighLevel also natively supports GoDaddy, Namecheap, and Ionos with the same one-click flow.
You can open the dropdown to see exactly which DNS records GoHighLevel will add (a CNAME pointing to HighLevel's branded-link infrastructure), but you do not have to. Just click Authorize, approve in Cloudflare, and wait. DNS changes technically can take up to 48 hours, but in practice it is almost always under 15 minutes.
What You Get
Once authorized, any form, calendar, or payment link you share via the share button uses your branded URL. So if I create a form on the GoBonsai sub-account, the share link starts with link.gobonsai.ai/widget/form/... instead of the default agency URL. Same brand, every shared link.
2. Funnels, Websites, Stores, Webinars, and Blogs Domain Setup
This is the domain customers actually visit. It is what your funnel pages live on, your websites, your storefront, your blog posts, and your webinar landing pages.
Where to Set It Up
Go to Settings, then Domains and URL Redirects. You can purchase domains through HighLevel here, or connect a domain you already own. Click Connect to add a new domain.
Picking the Right Domain Variant (www vs non-www)
This is the one decision that trips people up. When you add the domain, GoHighLevel asks if you also want to add the www version. Best practice is to pick one (either the www or the non-www) as your primary and redirect the other to it. Google and other search engines should only ever see one version, otherwise they treat them as duplicate content.
For most setups, the non-www version (e.g. shibuya13.com) as primary with the www version (www.shibuya13.com) redirecting to it works well. To do that, enter the non-www version as the domain and check the box to also add www. GoHighLevel will configure the www version to redirect automatically.
If you prefer the www as primary, enter www.yourdomain.com as the domain and check the box to also add the root version. Either pattern works, just be consistent.
The Subdomain Workaround
If your root domain is already in use somewhere else (a separate marketing website, an app, etc.), you cannot use the root inside GoHighLevel. The workaround is to use a subdomain. For example, if gobonsai.ai is already pointing at a Webflow site, you can connect go.gobonsai.ai inside GoHighLevel for funnels and websites, leaving the root domain free for the other use. The funnel URL becomes go.gobonsai.ai/funnel-name.
Resolving DNS Conflicts
If the domain you are connecting has existing DNS records that conflict with what GoHighLevel needs to add (common when the domain has been used for other things), Cloudflare will flag the conflict. You will need to log into Cloudflare, remove the old conflicting records, then come back to GoHighLevel and authorize. This is mostly a problem for domains that have hosted other apps before. For brand-new domains, there is nothing to clean up.
Assigning the Domain to a Funnel, Website, Blog, or Store
Once the domain is added, you go into Sites, then Manage Pages, click Edit on the domain, and pick which funnel, website, blog, or store the domain should point to. Each domain can be assigned to one primary destination. You can also set up a custom 404 page here for when someone hits a URL that does not exist, and enter robots.txt rules to control what search engines and AI crawlers can index. We cover the SEO side of this in our guide on publishing AI Studio sites and setting up SEO.
For each individual funnel, you can also override at the funnel level. Go into the funnel settings and pick which connected domain it should use. This is helpful if you have multiple domains in the account and want different funnels on different domains.
3. WordPress Domain Setup
WordPress hosting is an optional feature in GoHighLevel. If you are using it (which I recommend for some use cases, see below), you get a managed WordPress install you can manage directly from the HighLevel dashboard. It includes backups, analytics, plugin and theme management, and PHP version control.
Where to Set It Up
From your sub-account dashboard, go to the WordPress section in the left sidebar. Scroll down to Manage Your Domains. Click Add Domain.
The Setup Process
Use a subdomain like wp.yourbrand.com. WordPress hosted inside HighLevel runs on its own infrastructure with its own database, so it needs a different DNS configuration than your funnels and websites domain. That is why it is a separate setup, even if you are using the same root domain.
Click Autoconfigure. GoHighLevel pushes the records into Cloudflare automatically (a CNAME pointing to the WordPress hosting infrastructure) and issues an SSL certificate. The whole process takes about a minute. Authorize in Cloudflare, wait for the records to propagate, then click Verify DNS Records. All four indicators should turn green.
Setting the Primary Domain
You can have multiple domains pointing to the same WordPress site. The primary domain is the one that shows up by default. Set it from the same Manage Your Domains screen.
When WordPress Hosting Makes Sense
If you are running a content-heavy site with lots of posts, comments, plugins, or anything that benefits from the WordPress ecosystem (membership plugins, LMS plugins, e-commerce plugins), hosting it inside HighLevel keeps everything in one dashboard. If your site is simple landing pages or funnels, the native funnel builder is faster.
4. Email Sending Domain Setup (The Big One)
Email is the domain area where most agency owners get hung up. Bad email setup means your messages go to spam, your sender reputation tanks, and you cannot run campaigns or even basic transactional sends without problems. The good news is that HighLevel automates almost all of it through Cloudflare.
Where to Set It Up
Go to Settings, then Email Services. The top of the page shows recommendations for improving your deliverability, including "create a dedicated domain". Click that link, then Add New Domain.
The Subdomain Pattern
Email sending uses a subdomain like mail.yourbrand.com. The subdomain prefix can be anything (mail, send, hello), but the root has to match the email address you want to send from. So if you want emails to come from [email protected], the sending domain is mail.yourbrand.com. The mismatch between the subdomain prefix and the from-address local part is normal and does not cause problems, but the root must match.
What Cloudflare Auto-Adds
After you click Add and Verify, GoHighLevel connects to Cloudflare via the API and adds about 5 to 6 DNS records: DKIM, SPF, DMARC, and a few CNAMEs for the sending infrastructure. In the past you had to copy and paste each one, which was the single biggest source of email deliverability errors. The one-click flow is a huge improvement.
One note: DMARC sometimes gets added with p=none as the policy, which is the most permissive setting. For improved deliverability, you may want to update this later to p=quarantine or p=reject once you have confirmed your sending is working. We have a separate guide on GoHighLevel email templates that covers the email setup side beyond just domains.
Verifying the Domain
Verification can take a few minutes. Click Verify Domain. If it shows pending, wait 30 seconds and click again. You may need to click 2 or 3 times before everything turns green. Once all records show as verified and the SSL certificate is issued, the domain is ready.
Setting the Email Headers (From Name and From Email)
This is the part most people miss. Click the three dots next to your verified domain, then Set Headers. Enter the From Name (e.g. "GoBonsai") and the From Email (e.g. [email protected]). The From Email's domain MUST match the root of your sending domain. So if your sending domain is mail.gobonsai.ai, your From Email must end in @gobonsai.ai. If the roots do not match, you will have severe deliverability problems.
Adding Multiple Email Subdomains
One of the most useful patterns is setting up separate sending domains for different use cases. I typically set up four:
mail.yourbrand.com - general marketing emails, one-on-one conversations, bulk sends, campaigns
book.yourbrand.com - calendar booking notifications, appointment reminders, confirmation emails
payments.yourbrand.com - payment receipts, subscription notifications, refund confirmations
portal.yourbrand.com - client portal notifications, course updates, OTP emails
Why split? Two reasons. First, if one sending domain gets flagged for any reason (a deliverability hiccup, a bad batch of contacts, an over-aggressive send), the other domains keep working. Your payment receipts and calendar reminders are not interrupted by a marketing campaign issue. Second, splitting reputational risk across multiple sending identities is best practice for any business that sends at meaningful volume.
Set each one up the same way: add the subdomain, click Add and Verify, authorize in Cloudflare, set the headers. Each one needs its own From Email matching the root domain.
Domain Configuration: Assigning Email Subdomains to Use Cases
After setting up multiple sending domains, go to Email Services, then Domain Configuration. This is where you tell HighLevel which sending domain to use for each type of outbound email:
One-on-one conversation → mail
Bulk → mail
Campaign → mail
Calendar → book
Payments → payments
Client portal → portal
Client portal one-time OTP → portal
You can also split traffic across two domains for the same use case (50/50 load balancing), which is useful for high-volume senders. For most agencies, one domain per use case is enough.
Google Postmaster (Optional but Recommended)
HighLevel has a Google Postmaster integration that shows your domain reputation, spam rate, and authentication results directly inside the dashboard. Connect it from the Email Services page. Even though there was some uncertainty about Postmaster being phased out, as of mid-2026 it is still available and worth connecting.
5. Client Portal Domain Setup
The client portal is where your customers go to access courses, the community, files, and invoices. If you are running an AlphaBlossom-style free community or a paid course, this is the URL members use.
Where to Set It Up
Go to Memberships, then Communities, then Settings. You will see two domain fields: the platform URL (the default HighLevel-provided URL) and a custom domain field.
Cleaning Up the Platform URL
The default platform URL is something garbled like random-string.app.clienthub.net. First, change the platform URL prefix to your brand: yourbrand.app.clienthub.net. This is a free upgrade from the random string and looks much cleaner.
Adding the Custom Domain
The custom domain is your branded URL: members.yourbrand.com. Add it, click the button to add the domain, and Cloudflare adds a single CNAME pointing to clientportal.ludacris.cloud (HighLevel's client portal backend). Authorize in Cloudflare and wait.
Memberships and client portal domains tend to take longer to verify than other domain types, often 10 to 15 minutes for the full propagation. Be patient.
Cloudflare Tips That Apply to All GoHighLevel Domains
Use the Comment Field on Every Record
By the time you have set up 4 email subdomains plus a branded domain plus a websites domain, your Cloudflare DNS records list is dense. To stay organized, click into each record GoHighLevel added and add a comment like "GoHighLevel CRM email setup" or "GoHighLevel branded domain" or "GoHighLevel WordPress". This makes it trivial to find a specific record later when something needs to be edited or debugged.
Cloudflare Is Recommended But Not Required
GoHighLevel's automatic DNS configuration works with Cloudflare, GoDaddy, Namecheap, and Ionos natively. If you use a different DNS host, the auto-configuration will not work and you will need to add records manually. For agency owners managing multiple client domains, switching everything to Cloudflare pays off quickly.
DNS Propagation Realities
The standard "DNS changes can take up to 48 hours" warning is real, but in 2026 it almost never plays out that way. Most propagation is under 15 minutes. If you are seeing changes take longer than an hour, double-check your records, your DNS host status, and your Cloudflare cache settings.
The Recommended Setup Order
If you are setting up a brand new GoHighLevel sub-account, do the domain setup in this order. Each step depends on the previous in subtle ways, and this order gets you to "fully configured" with the least back-tracking.
Business Profile first. Before any domain setup, fill in the Business Profile settings including business legal name, EIN, and authorized representative. This data flows into A2P email and texting compliance.
Branded domain. Set this up second so any shared links you create during the rest of setup already use your brand.
Funnels and websites domain. Add the main domain that your customer-facing pages will live on.
Email sending domain(s). Set up at least
mail.yourbrand.com, ideally alsobookandpayments. Configure the headers. Assign in Domain Configuration.Client portal domain. Add
members.yourbrand.comif you have courses or a community.WordPress domain. Only if you are using HighLevel WordPress hosting.
Once this is done, you are ready to build. Everything you create inside the sub-account, from the first funnel to the first campaign to the first calendar, uses your brand consistently.
Why This Is Worth the Hour It Takes
Every domain you skip is a piece of the customer experience that defaults to HighLevel's branding instead of yours. Every email subdomain you do not set up properly is deliverability risk. Every DNS record you copy and paste manually is a chance for typos that you will be debugging weeks later. The one-time setup is dramatically easier than fixing each piece individually after the fact.
Do the whole thing at the start of a new sub-account. Block out an hour. Use Cloudflare. Follow this guide section by section. When you are done, you never have to think about domains again for that account.


