
AI Studio Visual Editor in GoHighLevel: Edit Faster, Save Money
GoHighLevel's AI Studio is one of the most exciting tools on the platform. You describe what you want in plain English and it builds websites, landing pages, and forms for you using vibe coding. The results are impressive, and people are already building some incredible things with it.
But until recently, every change you wanted to make had to go through the AI chat. Want to change a headline? Type it into the chat and wait one to three minutes. Want to adjust a color? Same thing. For small tweaks, that adds up fast, both in time and (soon) in cost, since HighLevel will start charging for AI token usage.
The new visual editor changes that. You click directly on any element, edit it instantly in a sidebar panel, and save. No AI processing, no wait time, and no token charges. If you are publishing AI Studio sites for yourself or for clients, this is going to save you significant time and money on every project.
AI Studio Visual Editor in GoHighLevel: Edit Faster, Save Money
What the Visual Editor Is and Why It Matters
How to Access the Visual Editor
Borders, Shadows, and Border Radius
When to Use the Visual Editor vs the AI Chat
Tips for Getting the Most Out of the Visual Editor
Watch "How to Use the AI Studio Visual Editor in GoHighLevel" on Youtube
What the Visual Editor Is and Why It Matters
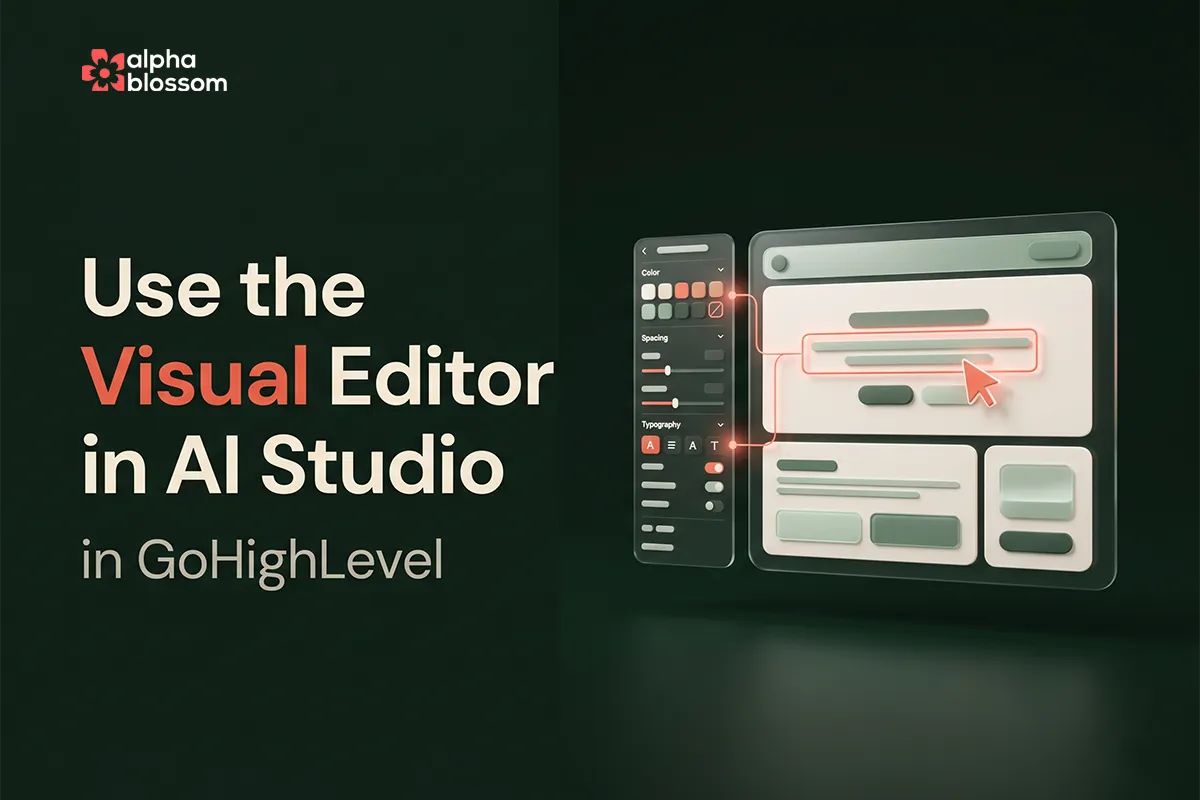
The visual editor is a new mode inside AI Studio that lets you click on any element on your page and edit its properties directly through a sidebar panel. Think of it as a lightweight CSS editor built right into the builder. You can change text, colors, spacing, typography, images, icons, links, and more, all without sending a single prompt to the AI.
The Cost Angle
AI Studio is free right now, but HighLevel has confirmed that token-based pricing is coming. Every prompt you send to the AI chat will cost tokens. Visual editor changes, however, are completely free. That means once you have the general layout built with the AI, you can switch to the visual editor for all the fine-tuning and polish without spending anything. For agencies building multiple sites per month, this difference adds up quickly.
The Speed Angle
Even setting cost aside, the visual editor is simply faster. A prompt to the AI chat takes anywhere from thirty seconds to three minutes depending on server load. Clicking on an element and changing a color takes about two seconds. When you are doing final polish on a site, dozens of small adjustments in the visual editor versus dozens of chat prompts is the difference between ten minutes and an hour.
How to Access the Visual Editor
Inside your AI Studio project, look for the Visual Edits button in the bottom-left corner of the screen. Click it, and the left panel switches to a preview mode. It may take a moment to load, especially during high-traffic periods. Once loaded, you can click on any element on the page and the sidebar will show all the editable properties for that element.
Everything You Can Edit
The visual editor covers a wide range of properties. Here is the complete list of what you can change.
Colors
Click on any element and you can change its color, background color, or border color. The editor provides a full color picker plus a set of preset color options organized by shade. You can match your brand colors precisely or use the presets for quick adjustments.
Spacing: Padding and Margin
Padding controls the space inside an element (between the content and its border). Margin controls the space outside an element (between it and neighboring elements). You can adjust all four sides together or click the expand icon to control each side individually. This is one of the most common visual editor uses, getting the breathing room right between sections, buttons, and content blocks.
Borders, Shadows, and Border Radius
You can add or adjust borders (width, style, color), drop shadows for depth effects, and border radius to round corners. These are the properties that turn a flat layout into something that feels polished and professional.
Opacity
Control the transparency of any element. Useful for overlay effects, watermark-style text, or fading background elements.
Typography
For any text element, you can change the font family, font style (italic, normal), font weight (bold, light, etc.), font size, and text alignment. The font family selector shows available fonts. For custom fonts, you may need to use the AI chat or the code editor to load them first, then select them in the visual editor.
Inline Text Editing
You can click directly on any text element and type your changes right on the page. No need to use the sidebar for simple text updates. This is the fastest way to fix typos, update headlines, or change button labels.
Images
Click on any image element and the sidebar lets you change the image source URL (upload to your media library and paste the URL), update the alt text (important for SEO and accessibility), and adjust the object fit (how the image fills its container). This is especially helpful when the AI generates placeholder images or when images display incorrectly, a common issue in AI Studio. Instead of prompting the AI to fix it, just swap the image URL directly.
Icons
AI Studio uses the Lucide icon library. Click on any icon and you can swap it for any other icon in the entire Lucide collection. You can also adjust the icon color and style from the sidebar.
Buttons and Inputs
For buttons, you can adjust all the visual properties plus the button text and link target. For form inputs, you can edit the placeholder text, the name attribute, and accessibility labels (ARIA labels). For text areas specifically, you can also adjust the number of visible rows.
Links
Click on any linked element and you can change the URL, set the target (open in same tab or new tab), and adjust the link text. This is much faster than asking the AI to update a link destination.
When to Use the Visual Editor vs the AI Chat
The visual editor is best for fine-tuning and polish: changing colors, adjusting spacing, fixing text, swapping images, and all the small tweaks that make a site feel finished. Use the AI chat for structural changes: adding new sections, reorganizing the layout, creating new components, or generating content. The most efficient workflow is to use the AI chat to build your rough layout, then switch to the visual editor for all the detail work. If you need to work with the underlying code directly, the code editor is also available for more advanced changes.
Tips for Getting the Most Out of the Visual Editor
Click Carefully
Elements are nested (a button inside a container inside a section). Clicking on different parts of an element may select its parent container instead. If you are not editing the right thing, try clicking more precisely on the specific element you want to change.
Save Often
Click the save button after making your visual edits. Changes are not automatically saved, so save frequently to avoid losing work if the page reloads.
Use the Visual Editor for Image Fixes
One of the most common AI Studio frustrations is images rendering incorrectly. Instead of going back and forth with the AI chat, upload the correct image to your media library, click on the broken image in the visual editor, and paste the new URL directly. Problem solved in seconds.
Next Steps
If you are building anything in AI Studio, start using the visual editor for your detail work today. It is faster, gives you more precise control, and will save you money once token pricing kicks in.
For the full workflow of getting your AI Studio site live, check out our guide on publishing AI Studio sites and setting up SEO. And if you are building forms in AI Studio, our AI Studio form automations guide shows you how to connect them to your workflows.
Related Links
How To Publish Your AI Studio Site and Set Up SEO in GoHighLevel
How to Trigger Automations From AI Studio Forms in GoHighLevel
Video Transcript
[0:07] Hey there! Welcome back to our YouTube channel. In this video I'm going to show you a cool new feature that's come to the AI studio. Inside of HighLevel. Or if you're an AlphaBlossom customer you will notice it inside of your account. So if you're not using the AI studio I really recommend you take a look at it. It's a visual chat app builder. So it allows you to build very cool apps websites landing pages funnels whole websites. Just by typing into the chat box. Having a conversation with the AI. And it builds amazing looking websites funnels. I've seen people build apps all kinds of really cool stuff with it. And so the downside was it's a new feature
[0:44] but until recently the only way to make changes was through the chat. And which can take sometimes 1 to 3 minutes. Or longer for these changes to go through. But if you want to just change a headline or maybe change a color or some spacing it's just kind of a waste of time to have to go into the chat. And then wait for the AI to figure that out. And make the changes. So just a few days ago they introduced a visual editor. Now you can click on the Visual Editor button. And you can just go in and type your changes. Update your colors. Things like that. So I'm going to show you how to do that inside of this video.
[1:16] And I'll cover all of the things that you can edit with the visual builder. So this should be very helpful for you. And here's the really important thing to know. Right now AI studio is free but it's not going to be free forever. They’re just as an intro to try to figure out how to make it better to get as many people using it as possible. It's free right now. But soon they're going to start charging for token usage. It's expensive to run these kind of things. And so it's not going to be free forever. The key is when they start charging for it If you use a visual builder that's free. So there's no charge
[1:45] to do visual edits. It's only when you're using AI to do things. So is very important. And if you're paying for the AI usage on a pay as you go type of basis this is a great way to save money. By using a visual editor. So I'm going to cover all that in the video. So make sure to subscribe to the channel. If you're not already. And I've got some HighLevel links down below. So if you're considering signing up for your own agency account make sure to check those links out as well. I've got a 30 day free trial. So you can start for 30 days. Get yourself some customers coming in to pay for your account
[2:15] before you even get your first bill from HighLevel. It's an amazing platform if you're looking to do any type of agency work. And I'm happy to support you as well. So that's it. Let's jump into it. And I'll see you on the other side. Okay so here we are inside of the AI studio. I'm just going to click into this project here. One of my clients. In the top dropdown you can see different pages. So we're going to head into the register page. This site is in Japanese and most of the work is being done in Japanese. So you may not understand some of this. But let's just come in here in down in the
[2:51] bottom left. You see this tiny little button it says Visual edits. If you click on that you'll see the left panel starts to say it's going to the preview. And you can see that nothing is showing. So it takes a while to load. You may notice depending on when you're watching this video in the banner. We're experiencing temporary high latencies. With LLM providers. Some features may be slower than usual. I'm going to close that. So basically this is a brand new feature. And people are losing their minds on this thing. And so they're getting a ton of usage. I'm seeing a lot of people having issues with things. My experience has worked very well. But every once in a while
[3:26] there's some weird things. Some glitchy things. People are sometimes seeing things like blank screens. And a prompter is not working and things like that. So just keep that in mind. It's still basically it just came out of. I'm not sure if it's still in beta. I think it's still a beta product. It is free to use right now. But there is going to be a charge because it does use tokens and things like that. But the nice thing about this visual builder is when they do start charging any changes you make through the visual editor are not charged. So these are free changes. So you can come in here and change these yourself. So let's say
[3:54] you want to just change the text. You can come up here and you can type whatever you want directly. Or you can go to the panel on the left and change it. You've got margin. Padding. All the changes here. So if I wanted to add a little bit of a padding inside of here. I could say I want to add 20 here. And you'll see that now that box has just gotten larger. I think in our case we were okay with the zero. I do want to add just a little bit of margin to the bottom here. So I'm going to click on this container. And then I'm going to come to the margin. And I'm going to open
[4:24] this little box here. So I can have individual control. I just want to adjust the bottom. So I'm going to maybe add another. A little bit there. That's 60. That's too much. Maybe I'm just going to do another 20. So I just want have a little bit more breathing room there. And that's it. You can come in here. And you can do things like icons. Icon family that it's using our Lucide icons. I think it's lucide. L.U.C.I.D.E. And so that's the family here. So you can select from just a myriad of icons here. And then you can adjust the colors. The style. Things like that. So maybe you want this to be a different color.
[4:57] You could come in here and say. I want it to be an accent color. Make that orange. But we're going to go back to gray. So let's just see what we've got here. That's a little bit too light. So a ton of presets here. Let's just go with the more medium slate. There we go. And then not quite centered in here. So I'm going to click on the input. And then maybe I want to have my top padding. Be a little bit less. So let's say let's make that 20. And now everything is lining up a little bit more. But now this one is off here. So I want to make this 120 also. Let me just
[5:40] adjust this. I just want to make the top 120. And everything looks pretty good. This is a call center. So I think we're good there. So yeah that's it. So you can just come in here and do the original edits. And then when you're done you can just click save. And now your changes are saved. Again if you're using the AI chat like if I came in here and said change the icon color to red. And then I just enter that. You can see it's going through this whole process. I was three seconds. So it's working on it. It's updating the color. You know it's not the end of the world. It's going to take a minute.
[6:12] Maybe two minutes. But if you're just trying to get this thing launched and you just want to get going it's much easier just to click on it. You've got your editor in the panel. Make the change and save. And again this is going to cost you. So it said the mail icon change to red. I don't see the changes here. So you may have to refresh the preview. So now you can see it's red. But again it wasn't the end of the world. Maybe that was maybe a minute. Maybe less. But it's much easier just to click on it here. Come find your color. Come down. We had a slate 400. Save. And you're done.
[6:44] So much more efficient way of making these kind of changes. Also things like images. Oops. Let's go back. That was a link. So. Oops. Let's do this again here. This is in the header. So this is actually not letting me. Oops. I gotta go back to visual editor. And that's way okay. So if I click here you can see here I can actually just change the image URL. So one thing I've noticed is sometimes the images do really weird things. And then you know to go to the prompt and say “Hey here's the image uploaded again.” Now you can just upload it to your media library and just come in here and then insert the actual URL.
[7:20] So you don't have to worry about it. So. What can you edit with the visual builder. So you can go on any element. Let's say we go to the button here. You can adjust Colors. You can adjust Spacing. Borders. Shadows. Or if you want to do like a box shadow things like that. Border radius. Opacity. And Typography. So you can change the font family. It's a little limited here. I don't see the custom fonts but probably through the visual builder. You can do custom fonts. Font style. Alignment. Font weight. Size. And things like that. So for text you can edit the content inline. So you can just come in here and type directly. For buttons.
[7:56] You can adjust the inputs. So here we've got all of this inputs. You can have a custom area label. Which is for like accessibility. And other things like that. Links. You can adjust the URL. The target you want it to open in a new tab. Same tab that kind of thing. For images. Again you can adjust the image source. You can adjust the alt text. Which is good for SEO. But more importantly it's good for accessibility. So people with screen readers can understand what the image is about. And then object fit. which is how it's going to fit inside of its container. And then for icons you can swap the icons from the entire library.
[8:33] And then for text areas. I don't have a text area here but for text areas you can adjust the placeholders. The names and the rows. How many rows are showing. So again this is a really cool really helpful. Hopefully this video helps you. You can see here also when you click on the image it shows down here in the ask AI. But we don't need to worry about that because we can just come in here and make our own changes. So that's it guys. So again. There is no charge when you're using the visual editor. So once HighLevel does start charging for the AI studio this is a way to save some costs. If you're not using.
[9:05] If you are not on the unlimited plan. That allows you to just come in and make your edits without any charges. Alright! Guys and Gals. So that is super awesome. I hopefully found that really helpful. I recommend using a visual editor as much as possible. Not only is it going to save you time but it's going to save you money as well. And it gives you a little bit more control. Sometimes it can be a little frustrating with the builder when you ask it to do something and it doesn't quite get what you mean. Or just off Or just off a little bit. So having the control to click into the visual editor and make the changes yourself
[9:33] it's just a really great option to have. So. That's it for this video. but I'll be talking a lot more about AI studio. As well as all things HighLevel. Plus my new upcoming app. Which is going to be amazing way for you to increase your social presence. Very easily. I can't wait to introduce that to you guys So if you're not already subscribed to the channel click that subscribe button down below. Check out my affiliate links down below. You've got a 30 day HighLevel free trial. And also our free community down below. You're welcome to join that. And I offer ton of support in there as well. So I will see you in the next video.


